
BillTrack50 Help Center
- Blog Post
- Estimated Read Time 4:00
The Custom Report Builder
There are many ways to share all your hard bill and regulation tracking work with the wider world - bill widgets, map widgets, stakeholder pages or even legislator scorecards. But sometimes you may need to make a customized report for a client or for your manager or perhaps a press release or to help an allied organization. BillTrack50 has got you covered with our Custom Report Builder, which works for both regulations and bills.
Setting up your Bill Sheet
The first step to creating a report is to select the bill sheet containing the bills you want in your report. Don't worry if there are more bills in the bill sheet than you need, we'll filter the extras out later. If you need bills on your report from more than one bill sheet you can create a rollup bill sheet and use that for your report. See this post for an explanation of how rollup bill sheets work.
Your report will contain the same information as the columns in your bill sheet so it's important that you have an appropriate template made with columns containing the information you want to pass on. Click here for an explanation of how to create templates and custom columns. You'll be able to select the template you want to use as one of the steps in the report building process -- it does not need to be the same template your bill sheet is using.
In the example below I have created a template called 'Custom Reports' that I'll use for all my reports for consistency:

Filtering and Sorting
My Ballot Measures bill sheet has 495 bills. I don't want to report on all of those, so I need to use the bill sheet filter(s) to narrow my sheet to just the bills I want on my report. Perhaps I just want California bills that have become law, so I filter the State column for 'CA' and the Bill Progress column for 'signed'. As a reminder, you get to a filter by hovering over the label of the column you want to filter on, for example the word "State" as shown below. Then click the three lines that appear next to the column label. This will bring up an appropriate filter for your column. Note filtered column headers are bold so you can easily remember which columns you are filtering on.

As you can see, filtering on state and bill progress brings my number of bills down to the 18 bills I specifically want on my report.
Next, we want to sort the bills so that they appear in the report in the order I think makes the most sense. To sort by a particular column in ascending order, click the column header. Click again to sort in descending order. An arrow will appear next to the header to show that it is sorted by that column. Note: you can sort by multiple columns by holding down the Shift key when you click on a second (or third...) column. Below, I am sorting by Action Date (most recent to less recent) and Position (alphabetically). A little arrow appears in the header to remind me which columns I have used for sorting.

Creating the Report
Now that we have our bill sheet showing the bills I want in the order I want them, we can go ahead and create the report. Simply click the Report button at the bottom of the bill sheet.:

Clicking the report button brings up a page that allows for further customization. You can add a suitable report title, add your logo if you've uploaded one (see this video for how to upload a logo) and pick which template to use. By default the system assumes you want to use the same template as you are using on your bill sheet. But you can choose a different template if you have certain columns you want to include or exclude from the report, or have a standard report format everyone in your company uses, or have some other reason for wanting a specific format for your report that is different than the bill sheet.

Once all the fields on the report screen are filled out click Run. After a few seconds the PDF report will be downloaded to your computer.
The Finished Report
The report will look like this. Note the logo in the top right corner and the date the report was run under the title. Also, custom columns will only be displayed if they contain information. So my 'Call to Action' appears for the first bill but not the second, as I didn't have a call to action in the bill sheet for that bill. The bill number and any other columns that are links in your bill sheet will also be links in the report:
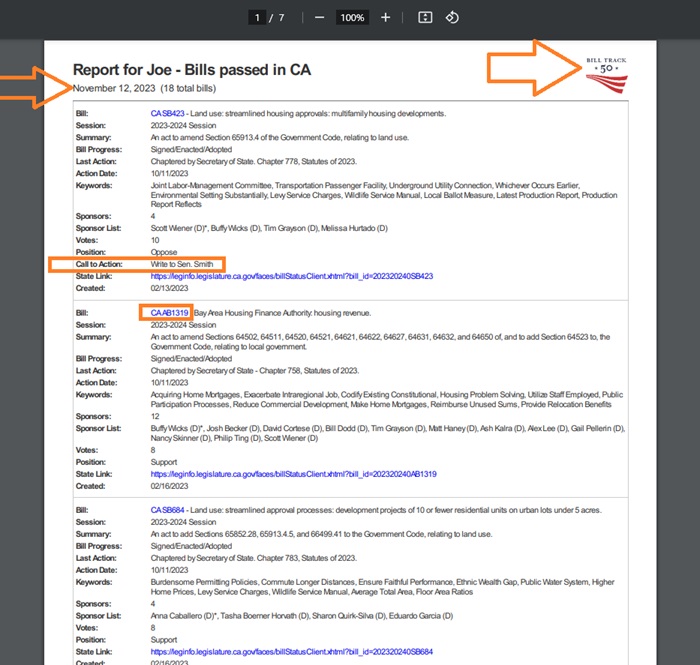
The PDF document is now ready to be distributed or printed out.
Regulations Reports
Regulation sheet reports work just the same as bill sheet reports. For regulation reports it is especially helpful for you to create a template and add extra information which can be shared in the report.
Cover photo adapted from a photo by Marcel Strauß on Unsplash